
App Extensions
Extensions are what allow your app to display inside the Commerce7 interface. The extension type that you should choose will depend on the app that you're offering and what it does. Play around with the different extension types and think about where it's most relevant for your app to appear. Extensions area added in your app version.
App extensions are available for full applications only. If you're building an integration only app, you won't see this area.
- Choose the area + extension type you want to use
- Set up the extension in your app
- Authenticate the user
- Style your app
Extension types
Extensions can appear as pages, within a page as an action or block, on the frontend website (online store) or as reports. The extensions available will depend on the area that you're wanting to add it to.
-
Page: Standalone page in admin, POS, or reservations.
Location options: Marketing Menu, Store Menu, Report Menu, POS Menu, Reservations Menu, Frontend Profile -
Context Menu: Adds an item to the "More Actions" menu. On click, the item can perform an action, link, or open a modal. (On the POS, this will add an action to the cart actions)
Location options: Order List, Order Detail, Cart Detail, Product List, Product Detail, Corporate Order Detail, POS Cart Summary -
Tab Menu: Adds a tab to an existing page.
Location options: Order Detail, Product Detail -
Report: Adds a report to one of Commerce7's existing report categories.
Location options: Order Report, Finance Report, Customer Report, Club Report, Inventory Report -
iFrame: Displays as a block within a page.
Location options: Frontend Receipt Primary, Frontend Receipt Secondary, Frontend Dashboard Primary, Frontend Dashboard Secondary. -
Card: Adds a stat card to an existing page.
Location options: Order Detail
Summary by application
Looking to add an extension to a specific application? Here you can find a list of your options based on the application. See above to learn more about each type. Note that some extensions will appear in multiple applications by default if the same data is accessible. ie. Since orders are accessible in both Admin and POS, if you were to add a "Context Menu" extension for "Order Detail", it'll appear in both automatically.
Admin
- Page: Marketing Menu, Store Menu, Report Menu
- Context Menu: Order List, Order Detail, Cart Detail, Product List, Product Detail, Corporate Order Detail
- Tab Menu: Order Detail, Product Detail
- Report: Order Report, Finance Report, Customer Report, Club Report, Inventory Report
- Card: Order Detail
POS
- Page: POS Menu
- Context Menu: Order List, Order Detail, Cart Detail, Corporate Order Detail, POS Cart Summary
- Tab Menu: Product Detail
- Report: Order Report
- Card: Order Detail
Reservation
- Page: Reservations Menu
Frontend V2 (online store)
- Page: Frontend Profile
- iFrame: Frontend Receipt Primary, Frontend Receipt Secondary, Frontend Dashboard Primary, Frontend Dashboard Secondary
Adding an extension
Extensions are added in your app version. Feel free to play around with the settings to determine the type of extension that will work best.
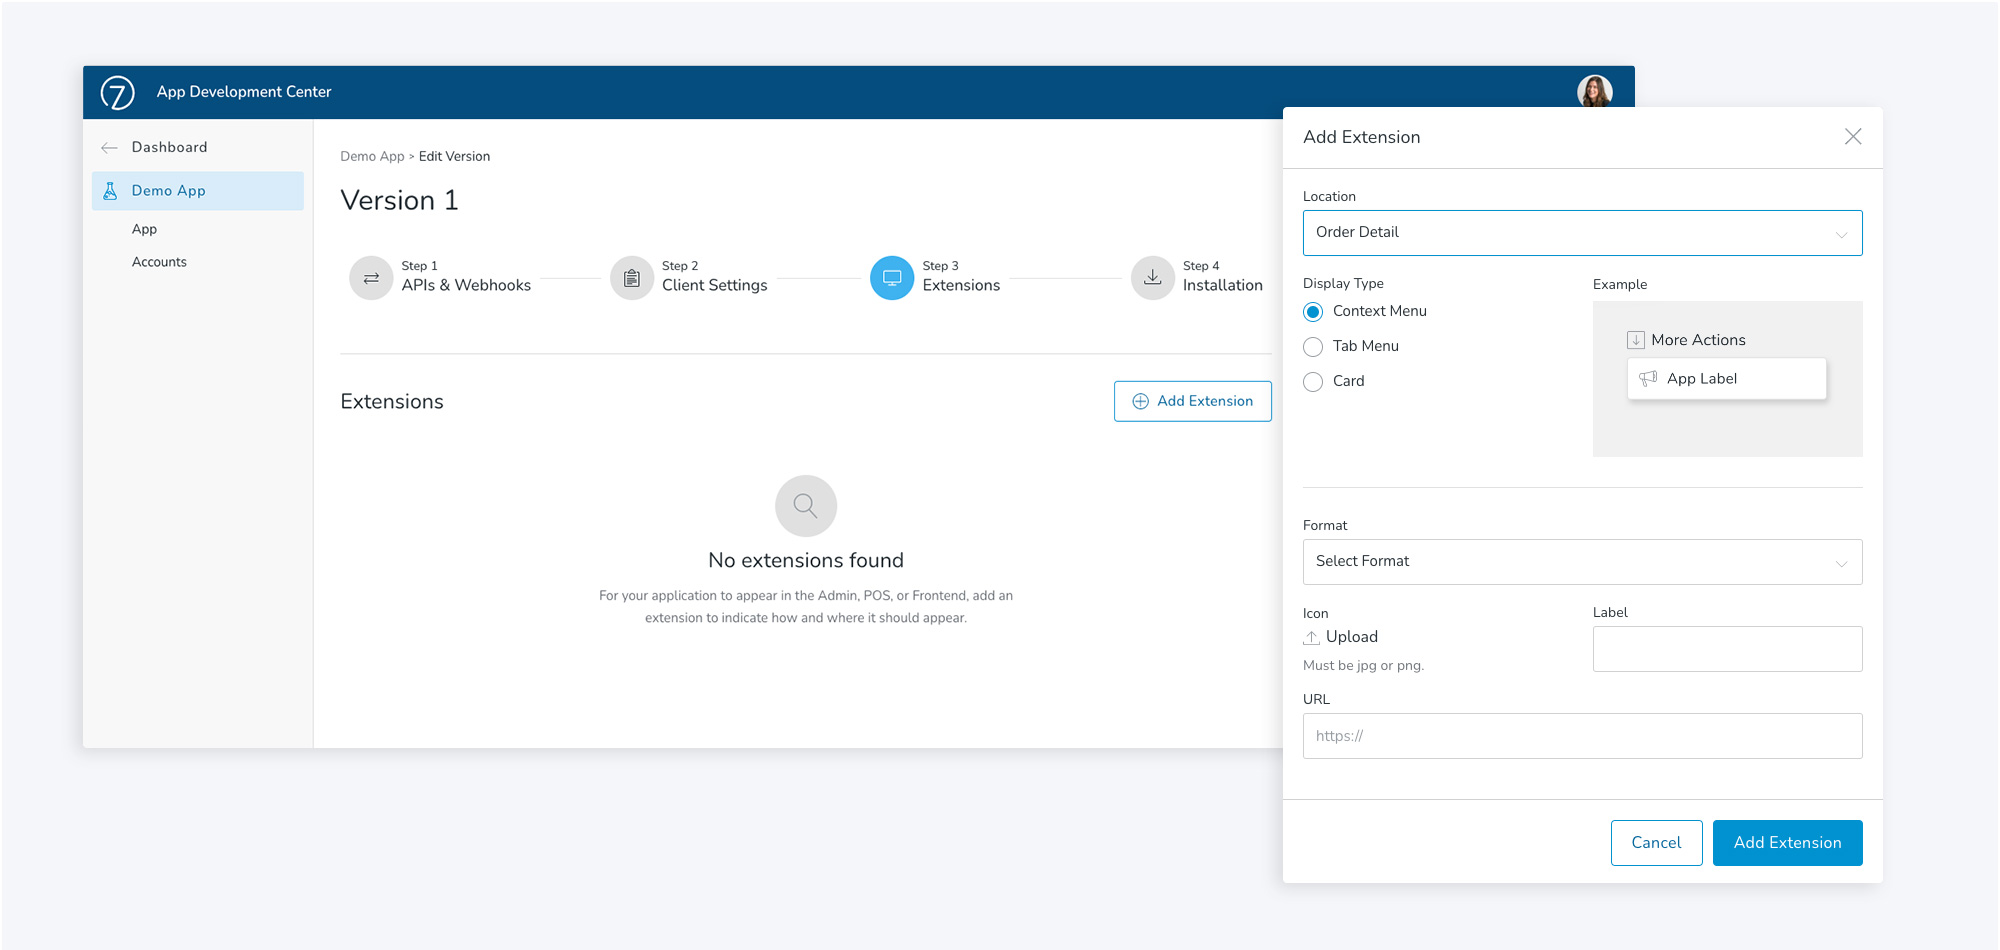
- In your app version, under Step 3. Extensions, click Add Extension
- Select a Location for your extension
- Based on the location and type of extension that you're adding, the following fields to complete will be slightly different. Once you've selected a location, a Display Type will appear. There could be one or multiple display types. Based on the Display Type that appears, follow that set of instructions below.
Page
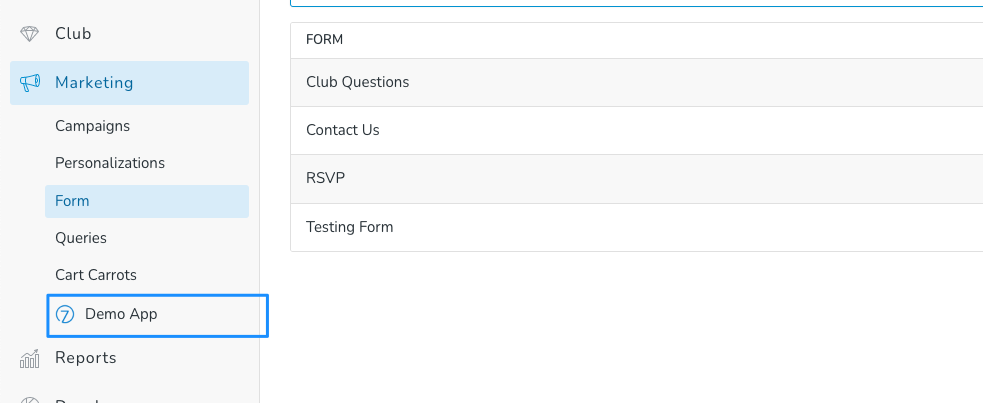
- To add a Page, after clicking Add Extension, for Location, select one of the following: Marketing Menu, Store Menu, Report Menu, POS Menu, Reservations Menu, Frontend Profile.
- Upload an Icon
- Enter a Title
- Add in a Page iFrame URL and optionally set a iFrame Height. A scroll will display if the height exceeds this.
- Click Add Extension
- On your page, you'll need to include the following Commerce7 javascript. It will allow the iFrame and the Commerce7 platform to communicate sizes properly.
<script type="text/javascript" src="https://dev-center.platform.commerce7.com/v2/commerce7.js"></script> - Now that the extension is setup, there's one more step to ensure that the user accessing the iFrame inside of Commerce7 is authenticated. View instructions here.
Example
Context Menu
- To add a Context Menu, after clicking Add Extension, for Location, select one of the following: Order List, Order Detail, Cart Detail, POS Cart Summary, Product List, Product Detail, Corporate Order Detail.
- If you have an option to select a Display Type, select Context Menu
- Select a Format of Action, Link, or Modal
- Action: Will perform an action on click
- Link: Will link to another URL on click
- Modal: Have your page display in a modal on click.
- Upload the Icon that will display on the menu item
- Add a Label indicating what the item does
- Enter a URL
- If you selected Action:
- Actions send a GET and require a specific JSON response.
- Use the following format for the JSON response:
{id: 'anything unique', type: '', message: ''}
"Type" ENUMs:error,info,success
- If you selected Modal:
- This should be an iFrame URL for the page that will display in the modal.
- Include the following Commerce7 javascript on your page to allow the iFrame and Commerce7 to communicate size properly.
<script type="text/javascript" src="https://dev-center.platform.commerce7.com/v2/commerce7.js"></script>
- Click Add Extension
- Now that the extension is setup, there's one more step to ensure that the user performing the action inside of Commerce7 is authenticated. View instructions here.
Example - Admin
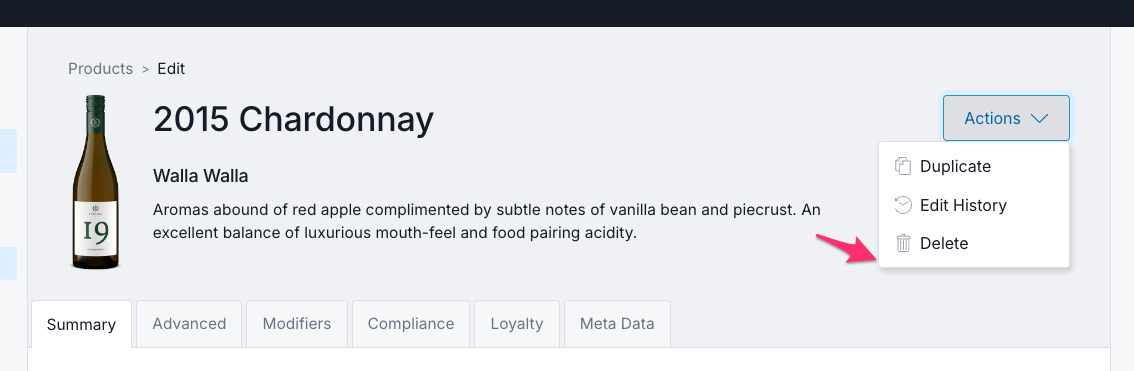
This extension type will be added to the bottom of the "Actions" dropdown. As an example, this is how the Product List Context Menu appears.
Example - POS
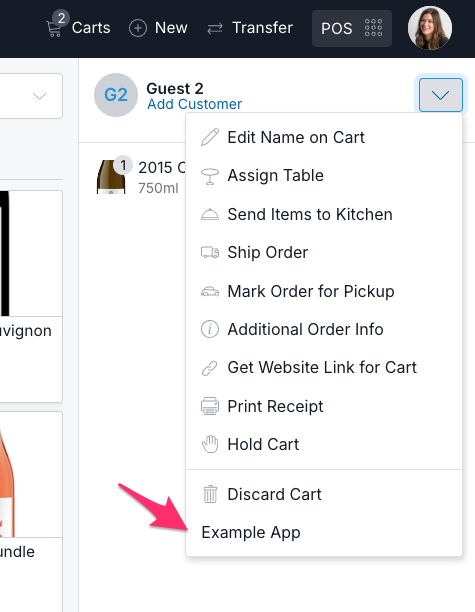
This extension type is added to the POS Cart actions at the top right of the page.
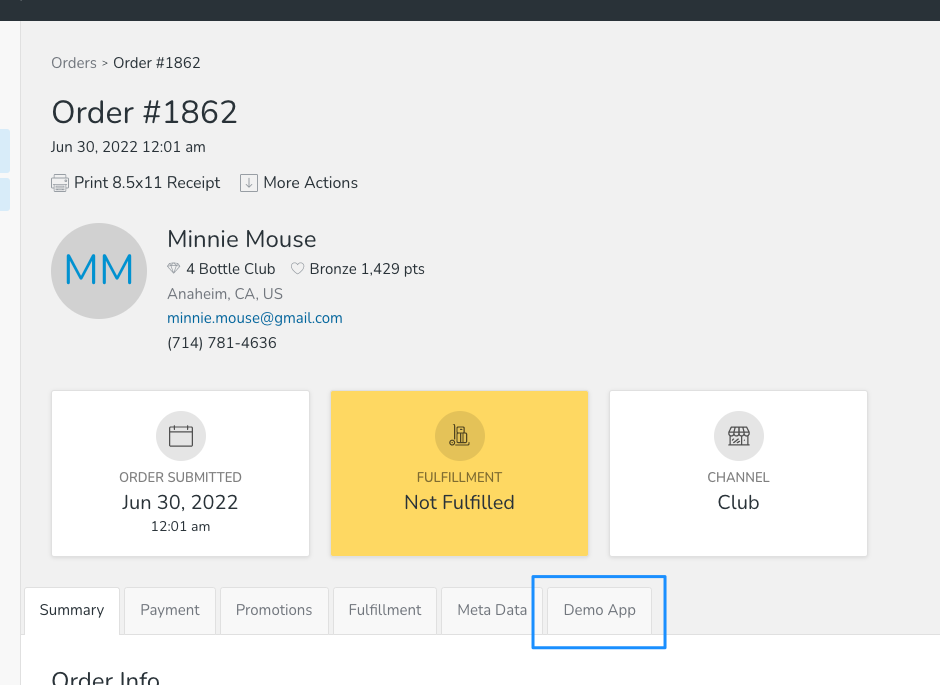
Tab Menu
- To add a Tab Menu, after clicking Add Extension, for Location, select one of the following: Order Detail, Product Detail.
- Select a Display Type of Tab Menu
- Add a Label
- Add in an iFrame URL to your app page that should display as the tab content.
- Click Add Extension
- On your page, you'll need to include the following Commerce7 javascript. It will allow the iFrame and the Commerce7 platform to communicate sizes properly.
<script type="text/javascript" src="https://dev-center.platform.commerce7.com/v2/commerce7.js"></script> - Now that the extension is setup, there's one more step to ensure that the user accessing the iFrame inside of Commerce7 is authenticated. View instructions here.
Example
Report
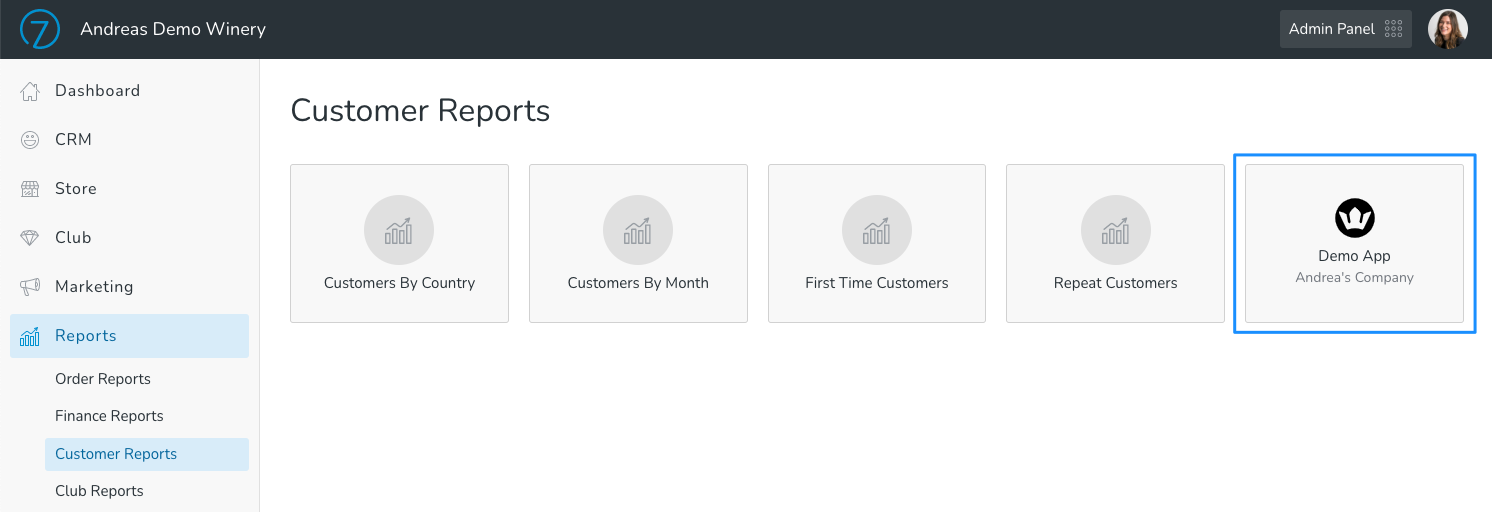
- To add a Report, after clicking Add Extension, for Location, select one of the following: Order Report, Finance Report, Customer Report, Club Report, Inventory Report.
- Upload an Icon. This will display in the linked card for the report.
- Enter a Title. Please make this descriptive for the type of the data.
- Add in a Page iFrame URL and optionally set a iFrame Height. A scrollbar will display if the height exceeds this.
- Click Add Extension
- On your page, you'll need to include the following Commerce7 javascript. It will allow the iFrame and the Commerce7 platform to communicate sizes properly.
<script type="text/javascript" src="https://dev-center.platform.commerce7.com/v2/commerce7.js"></script> - Now that the extension is setup, there's one more step to ensure that the user accessing the iFrame inside of Commerce7 is authenticated. View instructions here.
Example
iFrame
Note: Currently only is available for Frontend V2. Receipt iFrames appear on the order confirmation page. Dashboard iFrames appear on the customer's account dashboard.
- To add an iFrame, after clicking Add Extension, for Location, select one of the following: Frontend Receipt Primary, Frontend Receipt Secondary, Frontend Dashboard Primary, Frontend Dashboard Secondary.
- Enter a Title. Please make this descriptive for the type of the data.
- Add in a Page iFrame URL and optionally set a iFrame Height. A scrollbar will display if the height exceeds this.
- Click Add Extension
- On your page, you'll need to include the following Commerce7 javascript. It will allow the iFrame and the Commerce7 platform to communicate sizes properly.
<script type="text/javascript" src="https://dev-center.platform.commerce7.com/v2/commerce7.js"></script>
Card
Note: This extension type is not available for all developers. Please email [email protected] to request access. If approved, further instructions will be sent on how to format the JSON file.
- To add a Cart, after clicking Add Extension, for Location, select the following: Order Detail.
- Enter the URL of JSON
- Click Add Extension
Authenticating the user
When your app displays in Commerce7 (either in Admin or on a client's Frontend website), you need to authenticate each user to make sure that they have the right permissions to access the permissions to view the page or perform the action.
View the full instructions and what information is passed here.
Styling your app
To make your app cohesive with the rest of the Commerce7 we recommend using our Admin UI library of components.
You can also include the following CSS to add some basic styling to your iFrame / Page.
https://dev-center.platform.commerce7.com/beta/commerce7.css
FAQs
- Can I upload a different icon for light vs dark mode?
Currently, you can only upload a single icon that will be used for both.
Updated over 1 year ago