
APIs & Webhooks
After you've created your app, it's time to configure your version, most importantly the APIs and webhooks. If you haven't already taken a look through our APIs, you can do so here. Once you're familiar with them and ready to configure the APIs needed for your app, you can configure them in your app version.
APIs
Authenticating API requests
For every API request, you'll need to authenticate using Basic Auth with the username as your app's ID and the password your "App Secret Key". Learn more about authentication and requests here.
Do not place your App Secret Key in your javascript as this can be found by other users. Your key must be added through your backend files.
Select APIs to access
Depending on the APIs that you want to access, you'll need to select the specific API endpoints. When a client installs your app, this is the data and permission level that you'll be given access to.
Only request the access that your app needs. If you select access for data that is not used by your app, your app will be rejected in the submission process. This is for security purposes. (If you may require additional data down the road, you can always create a new version for your app and select additional APIs required.)
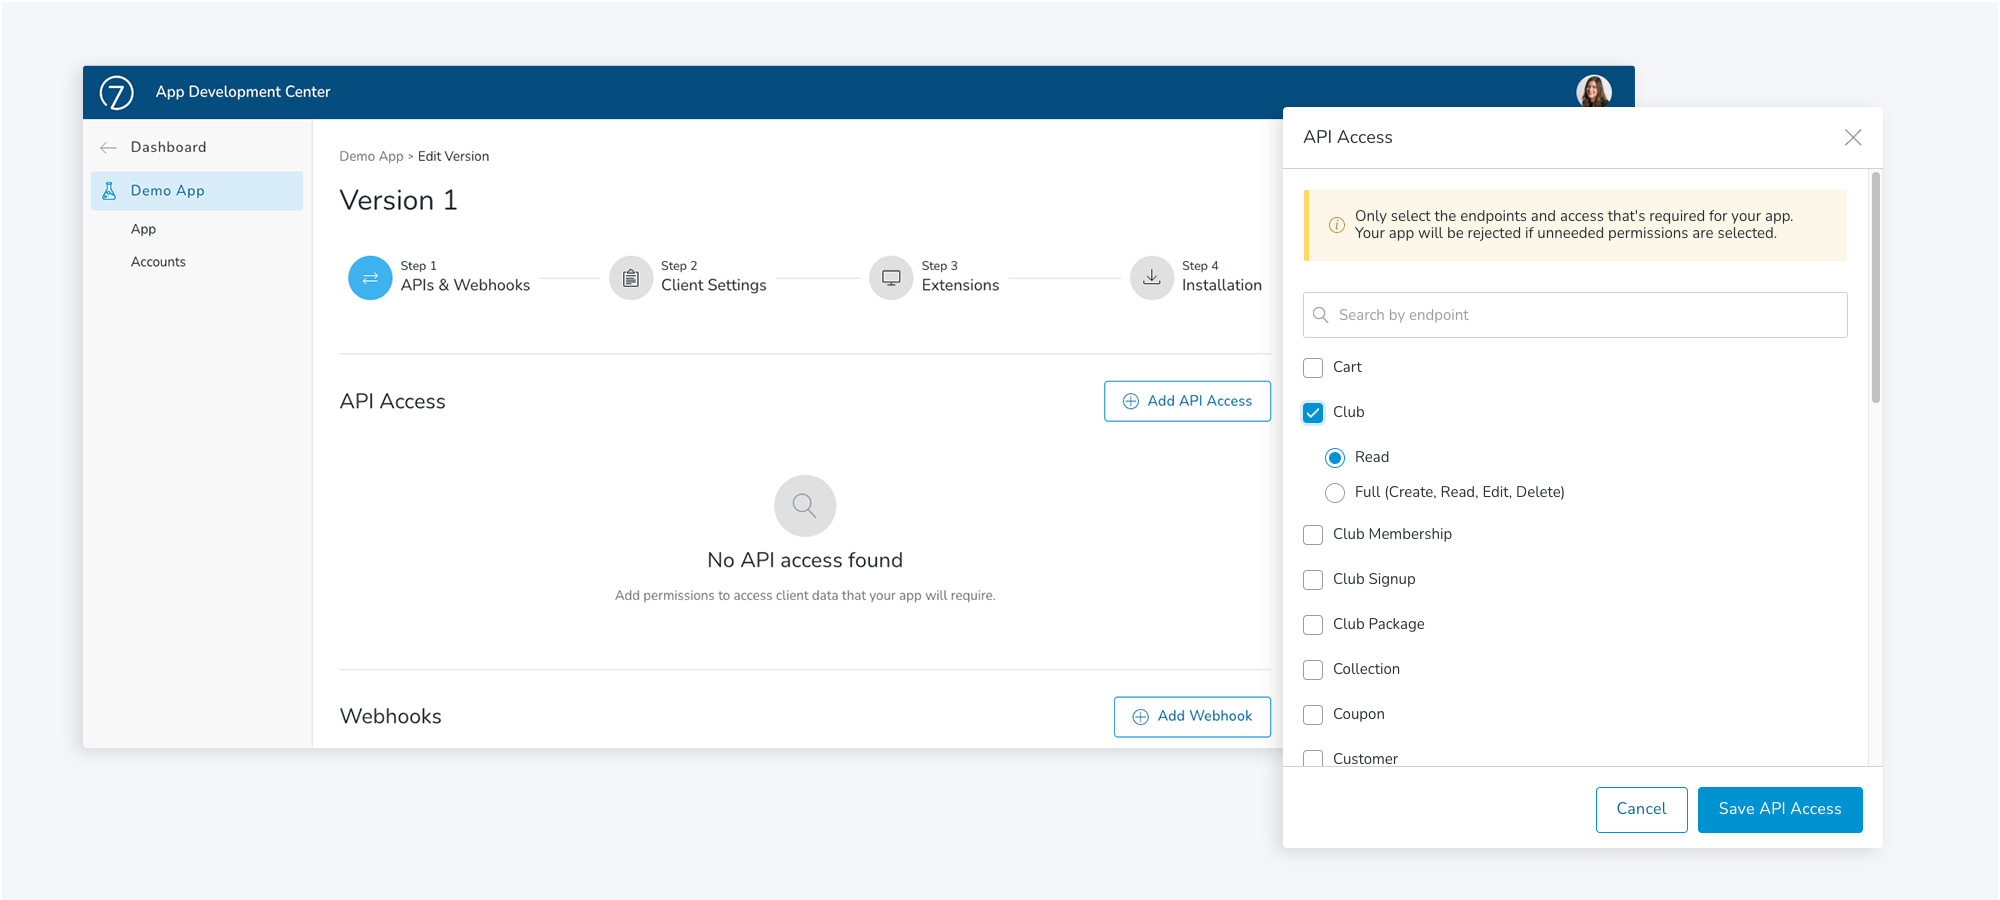
- In your app version, under Step 1. APIs & Webhooks, click Add API Access
- Search for the endpoint you need. Available endpoints are:
CartClubClub MembershipClub SignupClub Package(includes Subscription packages)CollectionCouponCustomerCustomer AddressCustomer Credit CardDepartmentEmailGift CardInventoryMetaData ConfigNoteOrderPOS ProfileProductPromotionPromotion SetQueryRefundReservationSettingShippingTagVendorWebHook
-
Check off the one(s) that you need and select whether the app requires Read or Full access.
For security purposes, make sure that you only access the data and permission level that you absolutely need. (ie. If you only need to "read" a certain endpoint, do not request "full" access.) -
Click Save
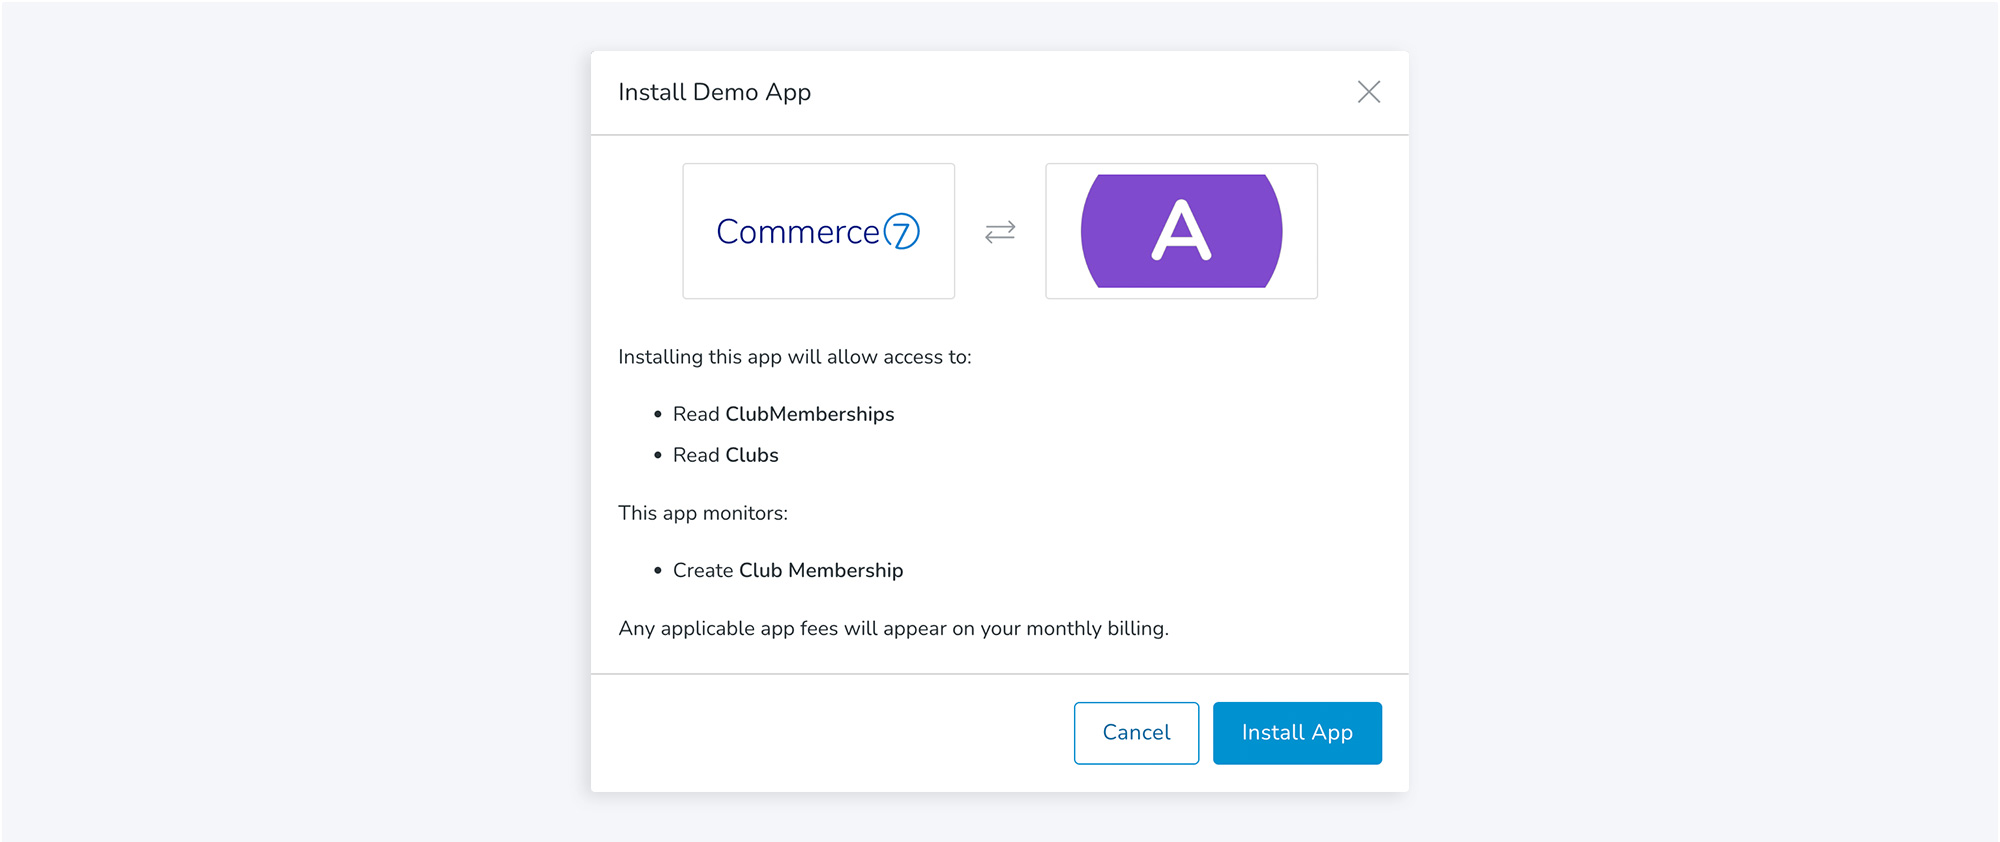
When clients install the app, they'll be able to see all of the data that you'll be accessing and they're required to confirm before the app can be installed.
Add webhook events
Add webhooks to be notified when an action takes place on an account who has installed your app. For example, if your app deals with clubs, you might need to be notified every time a club membership is edited. Commerce7 webhooks include orders, customers, club memberships and 12 other data objects.
Note: Webhooks created by your application can not be deleted in Commerce7 unless the app is uninstalled.
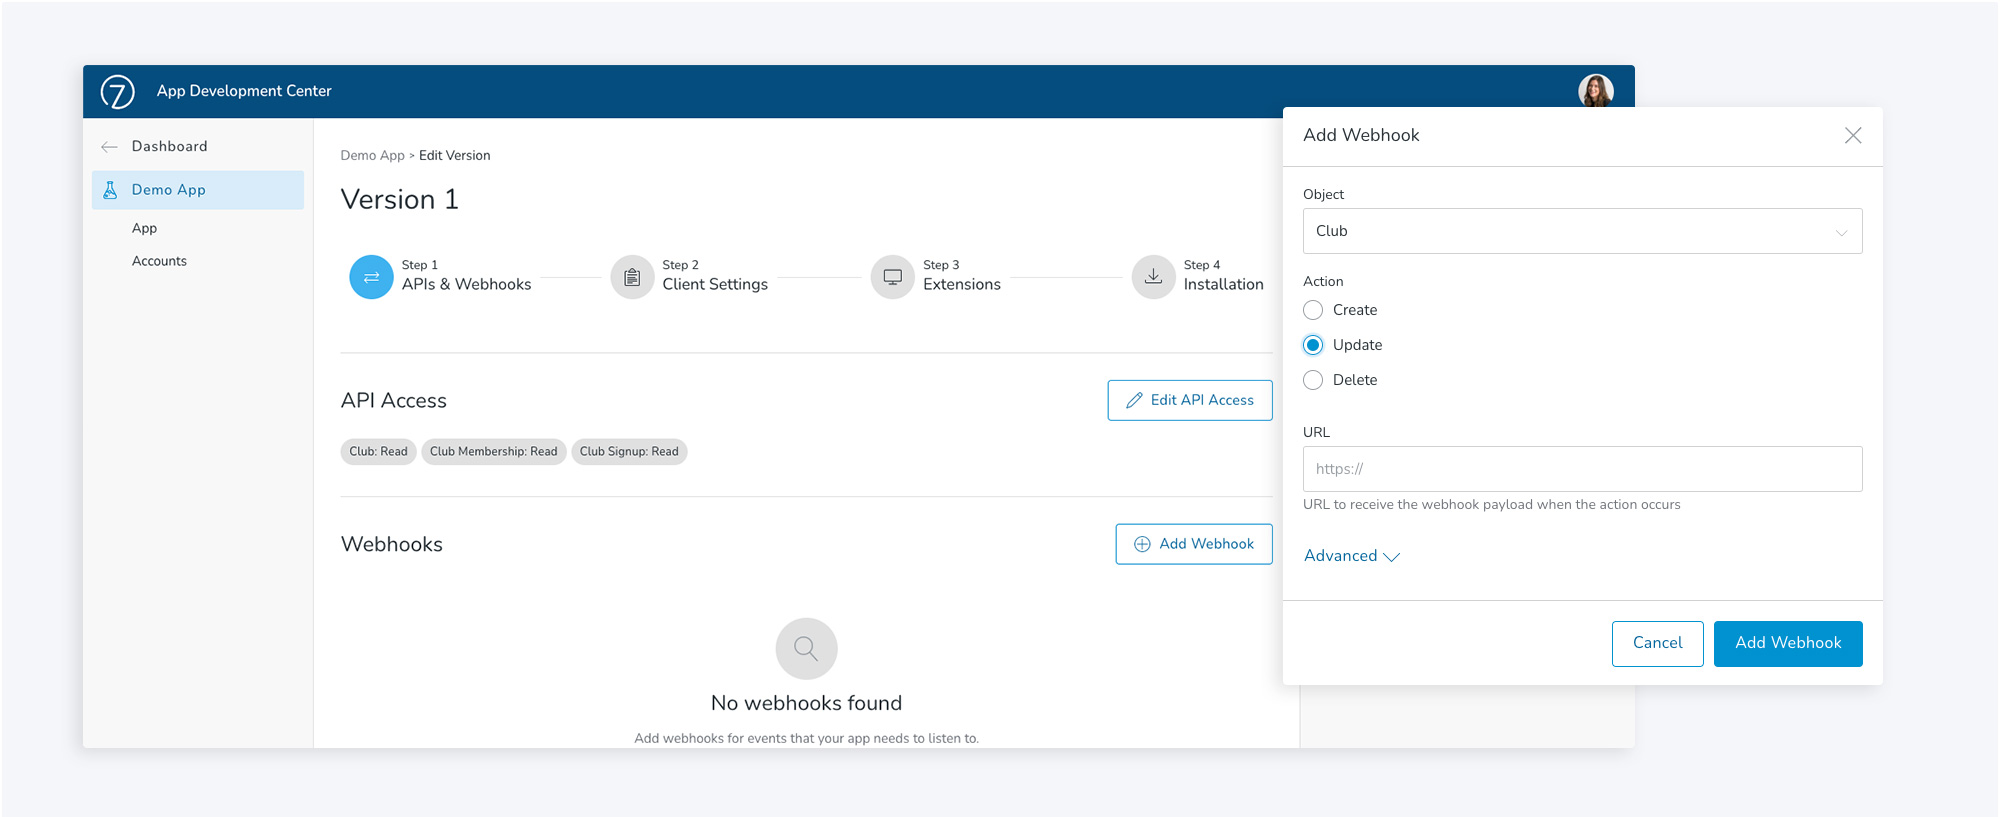
- In your app version, under Step 1. APIs & Webhooks, click Add Webhook
- Select the Object and the type of Action
- Enter the URL. When the action occurs in Commerce7, this URL will receive a JSON POST with the full object.
- Under Advanced you can optionally decide to enter in a Username and Password to secure the webhook.
- Click Add
If for whatever reason the webhook event fails, you'll receive a notification to the "Contact Email" that you added to your app settings. Webhook logs are also viewable in Commerce7 Admin under the Developer section for each account that has installed the app. (Clients will be able to see them as well.)
If your webhook event fails for 48 hours, it will be disabled. Once a webhook fails it cannot be enabled again and will need to be recreated.
Keep your app in sync
Increase confidence in your application by ensuring that all data received via an API or webhook is received and processed successfully, and then push those details back into the original object in Commerce7.
There are two API endpoints to facilitate this:
- Check webhook logs
- Push the sync status back to Commerce7
1. Webhook logs
If you utilize webhook logs to receive data, you want to ensure you don't miss any data. Best practice would be to use GET: /web-hook-log and check for any isSuccess=false. You can also include date ranges to only check since the last time you checked.
The list response is an array of web-hook-log objects, and each object contains the full payload of the original webhook call that failed. This allows you to process and consume any missing data with a single call to get the failed webhook sends.
Webhook log object
{
"id": "4317d7e7-9098-4aa9-b703-3dc714109cad",
"url": "https://apigateway.commerce7.com/lambdas/coolwines-post-order",
"object": "Order",
"action": "Create",
"payload": { ** Full Object **},
"user": "[email protected]",
"isSuccess": false,
"error": {
 "data": {
  "message": "Missing Authentication Token"
 },
 "status": 403,
 "message": "Request failed with status code 403"
},
"createdAt": "2020-01-03T18:08:50.635Z",
"updatedAt": "2020-01-03T18:08:50.635Z"
}
Parameters
- object:
['Allocation', 'Cart', 'Club', 'ClubPackage', 'ClubMembership', 'Collection', 'Coupon', 'Customer', 'CustomerAddress', 'CustomerCreditCard', 'Group', 'Product', 'Promotion', 'Order', 'TransactionEmail'] - action:
['Create', 'Update', 'Delete', 'Send'] - isSuccess:
boolean - updatedAt:
['gte', 'gt', 'lte', 'lt', 'btw']
{
"webHookLogs": [{
"id": "4317d7e7-9098-4aa9-b703-3dc714109cad",
"url": "https://apigateway.commerce7.com/lambdas/coolwines-post-order",
"object": "Order",
"action": "Create",
"payload": { ** Full Object ** },
"user": "[email protected]",
"isSuccess": false,
"error": {
 "data": {
  "message": "Missing Authentication Token"
 },
 "status": 403,
 "message": "Request failed with status code 403"
},
"createdAt": "2020-01-03T18:08:50.635Z",
"updatedAt": "2020-01-03T18:08:50.635Z"
},
{
"id": "d087e10c-c92b-4679-83d6-a76848b1c24d",
"url": "https://webhook.site/699f413c-556f-49ae-919d-87536715ee75",
"object": "Order",
"action": "Update",
"payload": { ** Full Object **},
"user": null,
"isSuccess": false,
"error": {
 "data": {
  "error": {
   "id": null,
   "message": "Token not found"
  },
  "success": false
 },
 "status": 404,
 "message": "Request failed with status code 404"
},
"createdAt": "2019-10-17T23:17:43.723Z",
"updatedAt": "2019-10-17T23:17:43.723Z"
}
],
"total": 2
}
2. App sync
App sync is an API endpoint that allows you to push the status of the data in your app back to the object in Commerce7. You can post as many syncs as you want per object. App sync data is public but only writable by your appId. To create the app sync use POST: /app-sync and to list use Get: /app-syncs/:objectId.
ENUMS
objectType:
['Order', 'Customer', 'Customer Address', 'Club Membership', 'Product', 'Reservation'] status: ['Error', 'Success']
Create app sync
{
"objectType": "Order",
"objectId": "",
"status": "Error",
"issues": ["Issue 1", "Issue 2"],
"actions": [{
 "httpType": "Get",
 "url": "https://",
 "label": "Resolve"
}]
}
List app sync
{
"appSyncs": [{
"id": "07e8d129-e6ff-4df8-bca4-c4c84a3ecef4",
"appId": "acme-order-fulfillment",
"objectType": "Order",
"objectId": "9b6e6e43-d163-4cbe-8e66-8e0783332f8e",
"status": "Error",
"lastActivityDate": "2020-02-07T17:11:21.400Z",
"createdAt": "2020-02-05T23:48:00.469Z",
"updatedAt": "2020-02-07T17:11:21.408Z",
"actions": [{
 "id": "a7193b6b-9678-4641-bbd3-622845af2ebe",
 "httpType": "Get",
 "url": "https://api.acmefulfillment.com/orders",
 "label": "Resolve"
}],
"attempts": [{
 "id": "8293ae6c-2428-44c5-98c2-de9a8a296d3d",
 "status": "Error",
 "activityDate": "2020-02-07T17:11:21.400Z",
 "issues": [{
  "id": "d8d2175a-ffc6-4a07-bfef-9eecc28fcf61",
  "appSyncAttemptId": "8294be6b-2428-44c5-98c2-de9a8a296d3d",
  "issue": "{\"error\":\"Weather Hold. Order could not be shipped.\"}"
 }]
}, {
 "id": "c8401b46-9685-4fb9-b845-e2c5368edeb9",
 "status": "Error",
 "activityDate": "2020-02-08T02:04:57.564Z",
 "issues": [{
  "id": "609c35b1-c992-44f7-b31a-504b090fc5bd",
  "appSyncAttemptId": "c8401a46-9685-4fb9-b845-e2c5368edeb9",
  "issue": "{\"error\":\"Weather Hold. Order could not be shipped.\"}"
 }]
}]
}],
"total": 1
}
Client install data
If an Install URL is entered, Commerce7 will send basic information on the client when the app is installed.
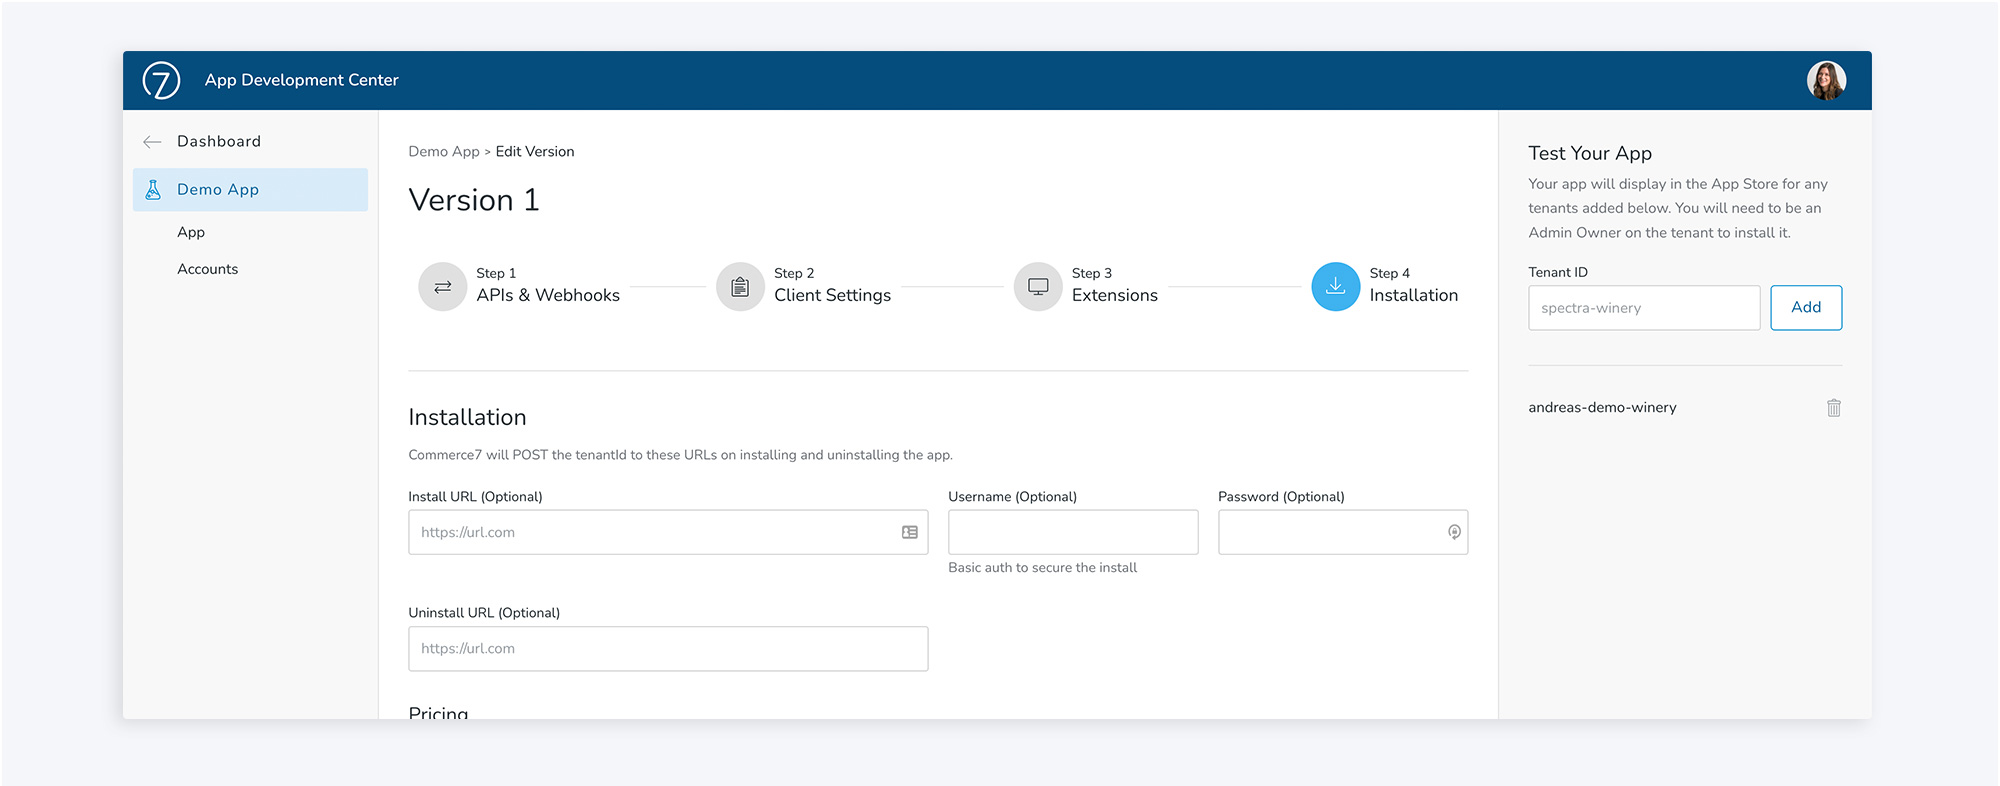
- In your app version, click Step 4: Installation
- Enter an Install URL and/or Uninstall URL
- Optionally add a Username and Password to secure the install to Commerce7
- When a client installs the app, Commerce7 will use authentication (if added) and will
POSTthe tenant ID and the first name, last name and email address of the user who installed the app.
Updated over 1 year ago